In a nutshell, photography is the art of capturing the reaction of light (how it bends and refracts) onto photosensitive materials. This makes night photography particularly tricky, because at night, everything is, well…dark. Images of the night sky, deserted streets, and a lake at dawn instill a sense of relaxing, peaceful awe in their viewers. But they can be shockingly frustrating to capture as a beginner, because automatic settings will just confuse the camera, so these shots require more technical understanding.But don’t fret! These tips for taking night photos with your Nikon Coolpix P1000 will quickly get you shooting like a pro.
Exclusive Bonus
We have recently partnered with Skillshare meaning that our readers are able to enroll on the best night time photography course on the platform without having to spend a cent! In addition to this, you also get two months of Skillshare premium so you can enroll on another of other excellent courses too. If you are wanting to get the best image quality possible when capturing your photographs at night then we would highly recommend the course to our readers as it has tons of great tips and tricks in it and it only takes around an hour to complete!
Equipment
First and foremost, let’s talk equipment. Because of the low-light, night photography requires a bit more than day-time photography might.
Non-Negotiables:
These are items you must have to make night photography worth the effort. Without them, your pictures won’t come out, and all that time and energy will just leave you disappointed rather than inspired. Fortunately, the first two of these items run fairly cheap for mid-range quality.
- Tripod: Low-light settings need slow shutter speeds and wider apertures. This means your images will be extra vulnerable to camera-shake, a blur in a picture caused by the camera moving around too much during exposure. While you may believe you’re holding your hands 100% still, this is actually impossible to achieve. A decent tripod allows you to stabilize your camera to prevent this. Make sure it’s weighted or otherwise secured, and safe from strong winds. For starters, you don’t want to risk the tripod falling over, but additionally, any slight movement can cause camera shake. A decent 50-inch collapsible tripod runs as little as $17 new.
- Remote Shutter Release: With night photography, shutter speeds with be so slow, even your finger on the shutter might cause unwanted blurriness. There’s no point in having a tripod without a remote release (also called an intervalometer) and vice versa. While you can pay upwards of $65 for a high-end model, corded shutter releases start at $10 on Amazon.
- Lens: Obviously, you need a camera lens to take photos, but for night photography, the non-negotiable part is having a lens that lets in a lot of light. This means you’ll want lenses that allow for apertures of at least f/2.8, but f/1.4 is preferable. If you’re going to focus on images of the night sky, aim for something with a wide focal length, to provide more clarity. If star trails are more your thing, go for a long focal length. The P1000 comes with a decent lens at a range of 4.3 to 539 mm and apertures of f/2.8 to 8.
Nice to haves:
These are add-ons. You don’t need them, but you’re better off having them.
- Lens hood: If you’re photographing buildings or streets at night, you’ll likely have a variety of bright lights surrounding you, like headlights, streetlamps, or neon signs. A lens hood will help cut flares from those lights.
- Extra Batteries: Long exposures created by slower shutter speeds will eat your camera batteries. Add in colder temperatures causing your camera to need to consume more power to stay warm, and you might have a dead battery within your first 20 minutes of shooting. Without backups, you’ll have to return to the scene a different night.
- Headlamp/Flashlight: You’ll need a light source to set up your tripod, find camera controls, and otherwise see by during setup. In a pinch, you could use your phone, but this is a cumbersome solution. And then you risk draining its battery too.
It’s All About Exposure
As mentioned previously, the biggest difference between night-time and day-time photography is the amount of light available for capture. To overcome low light, you’ll need to change either the shutter speed, aperture, or ISO. While it’s ideal to change all settings manually so as not to confuse the camera, if you’re a beginner this might be too challenging, so try semi-automatic modes.
Aperture Priority
The size of the aperture (the opening in the lens that allows in light) affects the depth of field while also affecting the amount of light let into the camera for the given shutter speed. Using a wide aperture (at least an f/2.8 but ideally f/1.2 – f/1.8).On your Nikon Coolpix P1000 do this by setting the camera to A mode and then rotate the multi-selector to choice the f-number. The camera will then automatically determine the appropriate shutter speed.
Shutter Priority
While day-time photography tends to use shutter speeds that are fractions of a second, but with night photography you’ll use shutter speeds of multiple seconds or longer. Shutter priority mode will allow you to choose slower speeds than your camera will select in Aperture priority mode.On your Nikon Coolpix P1000 do this by setting the camera to S mode and then rotate the command dial to choose the desired shutter speed. The camera will then automatically determine the appropriate aperture.
ISO
ISO controls the brightness of your photo; the higher the number, the brighter the photo. A higher ISO value causes the digital sensor to become more sensitive to light, allowing you to use a shorter shutter speed or smaller aperture. But, the higher the ISO value, the more noise (graininess) the image will have. Since darker areas also tend to produce more noise, you can’t just turn up the ISO all the way.To change the ISO on your Nikon Coolpix P1000, rotate the mode dial to P, S, M, A, or U1, then push the MENU button. From there, select the P, S, M, A, or U menu icon, select the appropriate ISO sensitivity setting, and push the OK button.
Bulb Mode
If you find yourself needing a slower shutter speed than what your camera will allow, try using bulb mode. This mode allows you to keep the shutter open for as long as you want, so long as you continue to keep your finger on the shutter release. This option is great for shooting more creative scapes, like star trails, light trails, fireworks, or light writing (think sparklers when you were a kid).To use the Bulb setting on your Nikon Coolpix P1000, refer to page 50 of the user manual.
Starting Point
There are no default settings for night-photography exposure, but it’s nice to have a starting point. Try starting with an aperture of f/5.6, a moderate size that lets in a decent amount of light. Then set your ISO to 400: high enough to prevent an insanely long shutter speed, but low enough for noise to not be problematic. See what shutter speed your camera automatically selects with those settings, it will be long but shouldn’t be more than a few seconds. If it is, play with the aperture and ISO until the shutter speed lowers.If you don’t have a tripod, your only option is to fully open the aperture and turn the ISO to at minimum 1600 and use the shutter speed suggested by the camera. However, the speed will still likely be longer than one second, meaning camera-shake will be an issue.
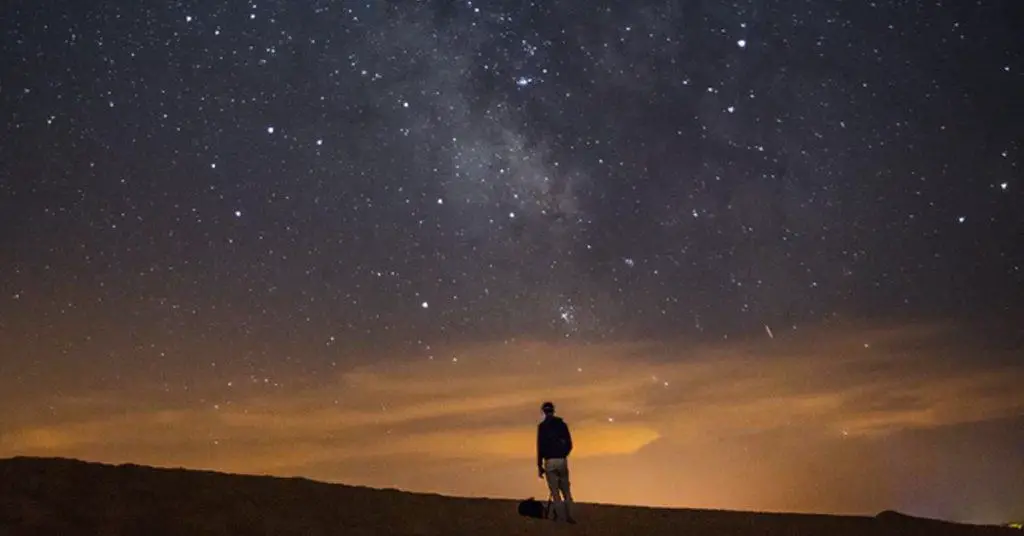
Night Sky
Taking shots of the night sky will almost always use similar exposure settings. A great starting point is
- Aperture: f/2.8
- ISO: 6400
- Shutter Speed: 15 seconds
Of course, you can adjust from there if needed. If the lens doesn’t go to 2.8, increase the ISO or the shutter speed appropriately. For example, if your maximum aperture is f/3.5, then the addition of 2/3 of a stop of light will be needed across the ISO and shutter speed. Each click increases the setting by 1/3 of a stop, so a one-click increase of ISO and a one-click increase of shutter speed will get you there. If you can’t crank the IS further, then two-clicks of the shutter speed will also get you there.While using a tripod, it’s tempting to simply lengthen your shutter speed, so you can keep your ISO lower and reduce noise. Your tripod will prevent camera shake, so of course this is the right way to go, right? Eh…not so much.Keep in mind that the earth itself moves, giving the appearance of stars moving across the sky. If you keep your shutter open for too long, those stars will have light trails causing the shot to appear blurry.
Exposure Bracketing
Exposure bracketing is a photographic technique where the camera will take multiple shots in different exposures, rather than one shot. This way, if you’re not sure if your exposure option is right, you’ll have two other options to play with in post-processing. With you Nikon P1000, you’ll have several different options when it comes to exposure bracketing: ±0.3, ±0.7, and ±1.0. Let’s say you line up a shot, and turn on Exposure bracketing with the option of ±0.7. Once you release the shutter button, the camera will take 3 shots in sequence; one at the chosen exposure (0), one at 0.7 under-exposure (-0.7) and one at 0.7 over-exposure (+0.7). The other options work the same way.
To turn on exposure bracketing on your Nikon P1000, rotate the mode dial to P, S, or A and click the MENU button. Next, choose the P, S, or A menu icon, select Exposure Bracketing, and push the OK button. Exposure bracketing is not available in M (Manual) mode.
Shoot Everything in RAW
While taking shots in JPEG will save you space on your memory card, RAW image files will maintain the integrity of detail in shadows, while the compression rate of a JPEG image won’t. Additionally, RAW files allow you more flexibility in post-processing, in case your exposure settings aren’t perfect.To take images in RAW on your Nikon P1000, while in any shooting mode push the MENU button. Next, select the shooting mode menu icon, select RAW, and push the OK button.
Use Manual Focus
Cameras focus by detecting contrast. In a dark scene, like that of most things you’ll be shooting at night, there’s not enough contrast for the camera to focus, so auto-focus is useless. You actually have two options here: if available, find areas of high contrast, and focus on those areas, or switch to manual focus.
If using Manual Focus, start by finding a bright light in the frame that is the same distance from you as your target subject. Good options include a streetlight, store sign, or the glow of a window. Aim for the edge of the light, where the brightness of the illumination meets the blackness of the sky. Use this contrast to set your focus, then move the camera to create the desired composition.
The use of Manual Focus on your Nikon P1000 is a bit more comprehensive than the scope of this article, so you’ll want to read up on it in your camera’s manual (starting on page 67).
Take Your Time
You can read every article, watch every video, and take every class on how to take good night shots, but at the end of the day you’ll never take a good snap if you aren’t patient. Take your time. Play with your settings, find the perfect spot, and take as many test shots as you want/need. There isn’t a one-size-fits-all solution for night photography, so the only way you’ll develop the skill is through trial and error. Much like how Grandma always knows when her cookies just aren’t quite there, and somehow knows to add a dash of salt, in time you’ll develop a feel for your exposure.
But it takes. time.
Conclusion
While it might seem a bit overwhelming at first, at worst, night photography is fun to experiment with, but at best, it’s infinitely rewarding, producing breath taking images. Hopefully, the tips listed above will give you the confidence to play. And remember, it’s digital! You don’t have to worry about wasting film, so take as many shots as you want.
